DataFed Tutorial
Contents
DataFed Tutorial#
Getting Started with DataFed#
In this notebook we will be going over basic concepts such as contexts, projects, understanding how DataFed responds to function calls, etc.
To get started, we need to import only the API class from CommandLab in the datafed package.
from datafed.CommandLib import API
Next, we need to instantiate the API class as:
df_api = API()
First DataFed function#
Let’s try out the DataFed API by simply asking DataFed for a list of all projects that we are part of using the projectList() function:
pl_resp = df_api.projectList()
print(pl_resp)
(item {
  id: "p/2021_berkeley_pfm_database"
  title: "2021_Berkeley_PFM_Database"
  owner: "u/jca318"
}
item {
  id: "p/2021_lane_martin_afm_database"
  title: "2021_Lane_Martin_AFM_Database"
  owner: "u/jca318"
}
item {
  id: "p/2021_lehigh_cornell_tem"
  title: "2021_Lehigh_Cornell_TEM"
  owner: "u/jca318"
}
item {
  id: "p/2021_lehigh_wallpaper_group_symmetry"
  title: "2021_Lehigh_Wallpaper_Group_Symmetry"
  owner: "u/jca318"
}
item {
  id: "p/2022_4dtem_noisy_benchmark"
  title: "2022_TEM_Noisy_Benchmark"
  owner: "u/jca318"
}
item {
  id: "p/2022_afm_oxford"
  title: "AFM Repository Oxford Instruments"
  owner: "u/jca318"
}
item {
  id: "p/2022_datafed_tutorial_lehigh"
  title: "2022_DataFed_Tutorial_Lehigh"
  owner: "u/jca318"
}
item {
  id: "p/2022_materials_project"
  title: "Materials Project Piezoresponse"
  owner: "u/jca318"
}
item {
  id: "p/2022_pld_plume_recording"
  title: "2022_PLD_Plume_Recording"
  owner: "u/yig319"
  creator: "u/jca318"
}
item {
  id: "p/lehigh_2021_band_excitation_pfm"
  title: "Band_Excitation_Piezoresponse_Force_Microscopy"
  owner: "u/jca318"
}
item {
  id: "p/lehigh_queens_university_belfast_2021"
  title: "2021_4D_TEM_needles"
  owner: "u/jca318"
}
item {
  id: "p/lehigh.cellsorter.2021"
  title: "Cell Sorter Project"
  owner: "u/jca318"
}
item {
  id: "p/lehigh.test"
  title: "Lehigh Test Project"
  owner: "u/stansberrydv"
}
item {
  id: "p/trn001"
  title: "TRN001 : DataFed Training"
  owner: "u/somnaths"
}
offset: 0
count: 20
total: 14
, 'ListingReply')
DataFed Messages#
DataFed responds using Google Protocol Buffer or protobuf messages
Let’s take a closer look at this response:
print(type(pl_resp), len(pl_resp))
<class 'tuple'> 2
As you can see, the reply is a tuple containing two objects, namely the protobuf message reply itself, [0] and the type of reply received, ListingReply at [1]. We can confirm this by checking the response type:
type(pl_resp[0])
SDMS_Auth_pb2.ListingReply
Contexts#
DataFed allows us to work within multiple different “data spaces” – such as our own Personal Data, and those of our Projects. Let’s find out what context DataFed automatically put us into using getContext():
print(df_api.getContext())
u/jca318
By default, DataFed sets our working space or context to our own Personal Data (u/username).
Specifying contexts:#
If we want to take a look at the root collection of the Training Project, we need to specify that using the context keyword argument:
print(df_api.collectionView("root", context="p/trn001"))
(coll {
  id: "c/p_trn001_root"
  title: "Root Collection"
  alias: "root"
  desc: "Root collection for project trn001"
  owner: "p/trn001"
  notes: 0
}
, 'CollDataReply')
Here’s what we get when we give the same collectionView request without the project context:
print(df_api.collectionView("root"))
(coll {
  id: "c/u_jca318_root"
  title: "Root Collection"
  alias: "root"
  desc: "Root collection for user Joshua C Agar (jca318)"
  owner: "u/jca318"
  notes: 0
}
, 'CollDataReply')
Subscripting and Iterating messages#
Let us take a look at the contents of the Project (its root Collection) using collectionItemsList()
ls_resp = df_api.collectionItemsList("root", context="p/trn001")
print(ls_resp)
(item {
  id: "c/35747646"
  title: "Addi Thakur Malviya"
  alias: "malviyaa"
  owner: "p/trn001"
  notes: 0
}
item {
  id: "c/35667650"
  title: "Alka Singh"
  alias: "singhar"
  owner: "p/trn001"
  notes: 0
}
item {
  id: "c/43524172"
  title: "Austin Ladshaw"
  alias: "ladshawap"
  owner: "p/trn001"
  notes: 0
}
item {
  id: "c/248807016"
  title: "Ben Chance"
  alias: "chancebr"
  owner: "p/trn001"
  creator: "u/somnaths"
  notes: 0
}
item {
  id: "c/35761498"
  title: "Bjoern Enders"
  alias: "benders"
  owner: "p/trn001"
  notes: 0
}
item {
  id: "c/43594529"
  title: "Bowen Li"
  alias: "shelllbw"
  owner: "p/trn001"
  notes: 0
}
item {
  id: "c/43644629"
  title: "Brian Kaul"
  alias: "bkaul"
  owner: "p/trn001"
  notes: 0
}
item {
  id: "c/43643184"
  title: "Charles Finney"
  alias: "ceafinney"
  owner: "p/trn001"
  notes: 0
}
item {
  id: "c/35522723"
  title: "Chris Lindsley"
  alias: "lindsley"
  owner: "p/trn001"
  notes: 0
}
item {
  id: "c/34559268"
  title: "Dale V. Stansberry"
  alias: "stansberrydv"
  owner: "p/trn001"
  notes: 0
}
item {
  id: "c/43524401"
  title: "Denis Ladychenko"
  alias: "dladyche"
  owner: "p/trn001"
  notes: 0
}
item {
  id: "c/35574448"
  title: "External Collaboration"
  owner: "p/trn001"
  notes: 0
}
item {
  id: "c/35522343"
  title: "Flavio Dal Forno Chuahy"
  alias: "dalfornochuf"
  owner: "p/trn001"
  notes: 0
}
item {
  id: "c/43523994"
  title: "Jens Glaser"
  alias: "glaserj"
  owner: "p/trn001"
  notes: 0
}
item {
  id: "c/34559341"
  title: "Jessica U. Breet"
  alias: "breetju"
  owner: "p/trn001"
  notes: 0
}
item {
  id: "c/35522132"
  title: "Johannes P. Blaschke"
  alias: "jpblaschke"
  owner: "p/trn001"
  notes: 0
}
item {
  id: "c/43524585"
  title: "Jonathan Sakkos"
  alias: "sakkosjo"
  owner: "p/trn001"
  notes: 0
}
item {
  id: "c/35760936"
  title: "Joseph Weaver"
  alias: "joeeweaver"
  owner: "p/trn001"
  notes: 0
}
item {
  id: "c/50107115"
  title: "Josh Agar"
  alias: "jca318"
  owner: "p/trn001"
  creator: "u/somnaths"
  notes: 0
}
item {
  id: "c/50103213"
  title: "Jouny Zedan"
  alias: "zedanjouny"
  owner: "p/trn001"
  creator: "u/somnaths"
  notes: 0
}
offset: 0
count: 20
total: 35
, 'ListingReply')
Much like the projectList(), we get a ListingReply in this case as well
Subscripting#
The listing reply item behaves similarly to a python list in terms of subscriptability. We can use indexing:
ls_resp[0].item[-2].title
'Josh Agar'
Iterating#
These messages also mirror python lists in their iterability.
We can iterate through the items in this listing and use the subscripting capability to only extract the id and alias fields of each of the collections
for record in ls_resp[0].item:
    print(record.id, "\t", record.alias)
c/35747646 	 malviyaa
c/35667650 	 singhar
c/43524172 	 ladshawap
c/248807016 	 chancebr
c/35761498 	 benders
c/43594529 	 shelllbw
c/43644629 	 bkaul
c/43643184 	 ceafinney
c/35522723 	 lindsley
c/34559268 	 stansberrydv
c/43524401 	 dladyche
c/35574448
c/35522343 	 dalfornochuf
c/43523994 	 glaserj
c/34559341 	 breetju
c/35522132 	 jpblaschke
c/43524585 	 sakkosjo
c/35760936 	 joeeweaver
c/50107115 	 jca318
c/50103213 	 zedanjouny
Aliases and IDs#
Let’s try taking a closer look at the PROJSHARE collection using its alias:
df_api.collectionView("projshare")
The above request failed because we asked DataFed to look for a Collection with alias: projshare without specifying the context. Naturally, DataFed assumed that we meant our own Personal Data rather than the training Project.
If we want to address an item by its alias, we need to be careful about its context since:
An alias is unique only within a given context such as Personal Data or a Project
Exercise: #
Correct the above function call to view projshare collection:
# Your Code Goes Here
df_api.collectionView("projshare", context="p/trn001")
(coll {
   id: "c/34559108"
   title: "Project Share"
   alias: "projshare"
   owner: "p/trn001"
   ct: 1610905739
   ut: 1611853827
   notes: 0
 },
 'CollDataReply')
Alternatively, we can view the correct collection by referring to it using its id:
df_api.collectionView("c/34559108")
(coll {
   id: "c/34559108"
   title: "Project Share"
   alias: "projshare"
   owner: "p/trn001"
   ct: 1610905739
   ut: 1611853827
   notes: 0
 },
 'CollDataReply')
The above command worked even though we did not specify a context because:
IDs are unique across DataFed and do not need a context
Setting Context:#
Having to specify the context for every function call can be tiring if we are sure we are working within a single context.
We can set the context via the setContext() function:
df_api.setContext("p/trn001")
Note
setContext() is valid within the scope of a single python session. You would need to call the function each time you instantiate the DataFed CommandLib.API class. E.g. - at the top of every notebook
Let’s attempt to view the projshare Collection via its alias without specifying the context keyword argument:
df_api.collectionView("projshare")
(coll {
   id: "c/34559108"
   title: "Project Share"
   alias: "projshare"
   owner: "p/trn001"
   ct: 1610905739
   ut: 1611853827
   notes: 0
 },
 'CollDataReply')
Exercise: #
Using the DataFed API’s collectionView(), extract the create time (ct) of your own personal collection within the training project or projshare.
Bonus: Consider using the built-in df_api.timestampToStr() function or datetime.datetime.fromtimestamp from the datetime package to convert the unix formatted time to a human readable string
# Your Code Goes Here
personal_collection_id = "c/34559108"
create_time = df_api.collectionView(personal_collection_id)[0].coll[0].ct

# Bonus:
df_api.timestampToStr(create_time)
'01/17/2021,12:48'
Data Records#
We will be going over how to create, add metadata and other contextual information, edit, establish relationships between Data Records - the fundamental unit in DataFed
Specifying context:#
Since we want to work within the context of the Training Project:
df_api.setContext("p/trn001")
To begin with, you will be working within your own private collection whose alias is the same as your DataFed username.
Exercise: #
Enter your username into the parent_collection variable
# Your Code Goes Here
parent_collection = "jca318"
Creating Data Records:#
Data Records can hold a whole lot of contextual information about the raw data.
Ideally, we would get this metadata from the headers of the raw data file or some other log file that was generated along with the raw data.
Note
DataFed expects scientific metadata to be specified like a python dictionary.
For now, let’s set up some dummy metadata:
parameters = {
    "a": 4,
    "b": [1, 2, -4, 7.123],
    "c": "Something important",
    "d": {"x": 14, "y": -19},  # Can use nested dictionaries
}
DataFed currently takes metadata as a JSON file, this can be achieved using json.dumps
import json

json.dumps(parameters)
'{"a": 4, "b": [1, 2, -4, 7.123], "c": "Something important", "d": {"x": 14, "y": -19}}'
We use the dataCreate() function to make our new record, and the json.dumps() function to format the python dictionary to JSON:
dc_resp = df_api.dataCreate(
    "my important data",
    metadata=json.dumps(parameters),
    parent_id=parent_collection,
    # The parent collection, whose alias is your username
)
dc_resp
(data {
   id: "d/412686165"
   title: "my important data"
   metadata: "{\"a\":4,\"b\":[1,2,-4,7.123],\"c\":\"Something important\",\"d\":{\"x\":14,\"y\":-19}}"
   repo_id: "repo/cades-cnms"
   size: 0.0
   ext_auto: true
   ct: 1667098575
   ut: 1667098575
   owner: "p/trn001"
   creator: "u/jca318"
   parent_id: "c/50107115"
 },
 'RecordDataReply')
Exercise: #
Extract the ID of the data record from the message returned from dataCreate() for future use:
# Your Code Goes Here
record_id = dc_resp[0].data[0].id
print(record_id)
d/412686165
Data Records and the information in them are not static and can always be modified at any time
Updating Data Records#
Let’s add some additional metadata and change the title of our record:
du_resp = df_api.dataUpdate(
    record_id,
    title="Some new title for the data",
    metadata=json.dumps({"appended_metadata": True}),
)
print(du_resp)
(data {
  id: "d/412686165"
  title: "Some new title for the data"
  metadata: "{\"a\":4,\"appended_metadata\":true,\"b\":[1,2,-4,7.123],\"c\":\"Something important\",\"d\":{\"x\":14,\"y\":-19}}"
  repo_id: "repo/cades-cnms"
  size: 0.0
  ext_auto: true
  ct: 1667098575
  ut: 1667098575
  owner: "p/trn001"
  creator: "u/jca318"
  notes: 0
}
update {
  id: "d/412686165"
  title: "Some new title for the data"
  owner: "p/trn001"
  creator: "u/jca318"
  size: 0.0
  notes: 0
  deps_avail: true
}
, 'RecordDataReply')
Viewing Data Records#
We can get full information about a data record including the complete metadata via the dataView() function. Let us use this function to verify that the changes have been incorporated:
dv_resp = df_api.dataView(record_id)
print(dv_resp)
(data {
  id: "d/412686165"
  title: "Some new title for the data"
  metadata: "{\"a\":4,\"appended_metadata\":true,\"b\":[1,2,-4,7.123],\"c\":\"Something important\",\"d\":{\"x\":14,\"y\":-19}}"
  repo_id: "repo/cades-cnms"
  size: 0.0
  ext_auto: true
  ct: 1667098575
  ut: 1667098575
  owner: "p/trn001"
  creator: "u/jca318"
  notes: 0
}
, 'RecordDataReply')
Exercise: #
Try isolating the updated metadata and converting it to a python dictionary.
Hint - json.loads() is the opposite of json.dumps()
# Your Code Goes Here
metadata = json.loads(dv_resp[0].data[0].metadata)
print(metadata)
{'a': 4, 'appended_metadata': True, 'b': [1, 2, -4, 7.123], 'c': 'Something important', 'd': {'x': 14, 'y': -19}}
Exercise: #
Now try to replace the metadata.
Hint: look at the metadata_set keyword argument in the docstrings.
You can make the new metadata new_metadata = {"key": "value", "E": "mc^2"}
Tip
With the cursor just past the starting parenthesis of dataUpdate(, simultaneously press the Shift and Tab keys once, twice, or four times to view more of the documentation about the function.
# Your Code Goes Here
new_metadata = {"key": "value", "E": "mc^2"}
du_resp = df_api.dataUpdate(
    record_id, metadata=json.dumps(new_metadata), metadata_set=True
)
dv_resp = df_api.dataView(record_id)
print(json.loads(dv_resp[0].data[0].metadata))
{'E': 'mc^2', 'key': 'value'}
Note
DataFed currently does not support version control of metadata. If you wanted to implement this it could be really valuable
Provenance#
Along with in-depth, detailed scientific metadata describing each data record, DataFed also provides a very handy tool for tracking data provenance, i.e. recording the relationships between Data Records which can be used to track the history, lineage, and origins of a data object.
Exercise: #
Create a new record meant to hold some processed version of the first data record.
Caution: Make sure to create it in the correct Collection.
# Your Code Goes Here
new_params = {"hello": "world", "counting": [1, 2, 3, 4]}

dc2_resp = df_api.dataCreate(
    "Subsequent Record", metadata=json.dumps(new_params), parent_id=parent_collection
)

clean_rec_id = dc2_resp[0].data[0].id
print(clean_rec_id)
d/412686316
Specifying Relationships#
Now that we have two records, we can specify the second record’s relationship to the first by adding a dependency via the deps_add keyword argument of the dataUpdate() function.
Note
Dependencies must be specified as a list of relationships. Each relationship is expressed as a list where the first item is a dependency type (a string) and the second is the data record (also a string)
DataFed currently supports three relationship types:
der- Is derived fromcomp- Is comprised ofver- Is new version of
dep_resp = df_api.dataUpdate(clean_rec_id, deps_add=[["der", record_id]])
print(dep_resp)
(data {
  id: "d/412686316"
  title: "Subsequent Record_412686316"
  metadata: "{\"counting\":[1,2,3,4],\"hello\":\"world\"}"
  repo_id: "repo/cades-cnms"
  size: 0.0
  ext_auto: true
  ct: 1667098576
  ut: 1667098576
  owner: "p/trn001"
  creator: "u/jca318"
  deps {
    id: "d/412686165"
    type: DEP_IS_DERIVED_FROM
    dir: DEP_OUT
  }
  notes: 0
}
update {
  id: "d/412686316"
  title: "Subsequent Record_412686316"
  owner: "p/trn001"
  creator: "u/jca318"
  size: 0.0
  notes: 0
  deps_avail: true
  dep {
    id: "d/412686165"
    type: DEP_IS_DERIVED_FROM
    dir: DEP_OUT
  }
}
, 'RecordDataReply')
Exercise: #
Take a look at the records on the DataFed Web Portal in order to see a graphical representation of the data provenance.
Exercise: #
1. Create a new data record to hold a figure in your journal article.
2. Extract the record ID.
3. Now establish a provenance link between this figure record and the processed data record we just created. You may try out a different dependency type if you like.
4. Take a look at the DataFed web portal to see the update to the Provenance of the records
# Your Code Goes Here
# 1
reply = df_api.dataCreate("Figure 1", parent_id=parent_collection)
# 2
fig_id = reply[0].data[0].id
# 3
provenance_link = df_api.dataUpdate(fig_id, deps_add=[("comp", clean_rec_id)])
print(provenance_link[0].data[0])
id: "d/412686352"
title: "Figure 1_412686352"
repo_id: "repo/cades-cnms"
size: 0.0
ext_auto: true
ct: 1667098576
ut: 1667098576
owner: "p/trn001"
creator: "u/jca318"
deps {
  id: "d/412686316"
  type: DEP_IS_COMPONENT_OF
  dir: DEP_OUT
}
notes: 0
Transferring Data in DataFed#
# imports necessary packages

import json
import os
import time
from datafed.CommandLib import API
Instantiate the DataFed API and set context to the Training project:
df_api = API()
df_api.setContext("p/trn001")
Exercise #
Enter your username to work within your personal Collection.
# Your Code Goes Here
parent_collection = "jca318" # your username here
Exercise #
Copy over the ID for the record you created previously
# Your Code Goes Here
record_id = "d/412681057"
Uploading raw data#
We will learn how to upload data to the record we just created. For demonstration purposes, we will just create a simple text file and use this as the raw data for the Data Record
Note
DataFed does not impose any restrictions on the file extension / format for the raw data
datapath = './datapath'

# This just writes some text
with open(datapath + "/raw_data.txt", mode="w") as file_handle:
    file_handle.write("This is some data")
Note
Ensure that your Globus endpoint is active and that your files are located in a directory that is visible to the Globus Endpoint
Uploading data files to DataFed is done using the dataPut command.
put_resp = df_api.dataPut(
    record_id,
    datapath + "/raw_data.txt",
    wait=True,  # Waits until transfer completes.
)
print(put_resp)
(task {
  id: "task/412686392"
  type: TT_DATA_PUT
  status: TS_SUCCEEDED
  client: "u/jca318"
  step: 3
  steps: 4
  msg: "Finished"
  ct: 1667098577
  ut: 1667098582
  source: "f134f91a-572a-11ed-ba55-d5fb255a47cc/C/Users/jca92/Documents/codes/Fall_2022_MEM_T680Data_Analysis_and_Machine_Learning/jupyterbook/Topic_7/DataFed/datapath/raw_data.txt"
  dest: "d/412681057"
}
, 'TaskDataReply')
We get two components in the response:
Information about the Data Record, data was uploaded to
Information about the data transfer
task- more on this later
The dataPut() method initiates a Globus transfer on our behalf from the machine wherever the file was present to wherever the default data repository is located. In this case, the file was in our local file system and on the same machine where we are executing the command.
Note
The above data file was specified by its relative local path, so DataFed used our pre-configured default Globus endpoint to find the data file. As long as we have the id for any active Globus endpoint that we have authenticated access to, we can transfer data from that endpoint with its full absolute file path – even if the file system is not attached ot the local machine. Look for more information on this in later examples.
Let’s view the data record now that we’ve uploaded our data. Pay attention to the ext and source fields which should now populated:
dv_resp = df_api.dataView(record_id)
print(dv_resp)
(data {
  id: "d/412681057"
  title: "Some new title for the data"
  metadata: "{\"E\":\"mc^2\",\"key\":\"value\"}"
  source: "f134f91a-572a-11ed-ba55-d5fb255a47cc/C/Users/jca92/Documents/codes/Fall_2022_MEM_T680Data_Analysis_and_Machine_Learning/jupyterbook/Topic_7/DataFed/datapath/raw_data.txt"
  repo_id: "repo/cades-cnms"
  size: 17.0
  ext: ".txt"
  ext_auto: true
  ct: 1667097842
  ut: 1667098228
  dt: 1667098228
  owner: "p/trn001"
  creator: "u/jca318"
  deps {
    id: "d/412681212"
    type: DEP_IS_DERIVED_FROM
    dir: DEP_IN
  }
  notes: 0
}
, 'RecordDataReply')
Downloading raw data#
DataFed is also capable of getting data stored in a DataFed repository and placing it in the local or other Globus-visible filesystem via the dataGet() function.
Let us download the content in the data record we have been working on so far for demonstration purposes
get_resp = df_api.dataGet(
    record_id,
    datapath,  # directory where data should be downloaded
    orig_fname=False,  # do not name file by its original name
    wait=True,  # Wait until Globus transfer completes
)
print(get_resp)
(task {
  id: "task/412686509"
  type: TT_DATA_GET
  status: TS_SUCCEEDED
  client: "u/jca318"
  step: 2
  steps: 3
  msg: "Finished"
  ct: 1667098585
  ut: 1667098590
  source: "d/412681057"
  dest: "f134f91a-572a-11ed-ba55-d5fb255a47cc/C/Users/jca92/Documents/codes/Fall_2022_MEM_T680Data_Analysis_and_Machine_Learning/jupyterbook/Topic_7/DataFed/datapath"
}
, 'TaskDataReply')
In the response we only get back information about the data transfer task - more on this shortly
dataGet() reveals its capability to download multiple data records or even Collections.
Let’s confirm that the data has been downloaded successfully:
os.listdir(datapath)
['408461737.txt', '412681057.txt', 'raw_data.txt']
expected_file_name = os.path.join(datapath, record_id.split("d/")[-1]) + ".txt"
print("Does a file with this name: " + expected_file_name + " exist?")
print(os.path.exists(expected_file_name))
Does a file with this name: ./datapath\412681057.txt exist?
True
Tasks#
Note
A DataFed task may itself contain / be responsible for several Globus file transfers, potentially from / to multiple locations
DataFed makes it possible to check on the status of transfer tasks in an easy and programmatic manner.
Before we learn more about tasks, first lets try to get the id of the task in get_resp from the recent dataGet() function call:
task_id = get_resp[0].task[0].id
print(task_id)
task/412686509
Viewing Tasks#
We can get more information about a given transfer via the taskView() function:
task_resp = df_api.taskView(task_id)
print(task_resp)
(task {
  id: "task/412686509"
  type: TT_DATA_GET
  status: TS_SUCCEEDED
  client: "u/jca318"
  step: 2
  steps: 3
  msg: "Finished"
  ct: 1667098585
  ut: 1667098590
  source: "d/412681057"
  dest: "f134f91a-572a-11ed-ba55-d5fb255a47cc/C/Users/jca92/Documents/codes/Fall_2022_MEM_T680Data_Analysis_and_Machine_Learning/jupyterbook/Topic_7/DataFed/datapath"
}
, 'TaskDataReply')
We get a new kind of message - a TaskDataReply.
Key fields to keep an eye on:
statusmsgsourcedest
If we are interested in monitoring tasks, triggering activities or subsequent steps of workflows based on transfers, we would need to know how to get the status property from the TaskDataReply:
task_resp[0].task[0].status
3
Even though the message above says TS_SUCCEEDED, we see that this task status codes to the integer 3.
Note
Cheat sheet for interpreting task statuses:
2: in progress
3: complete
anything else - problem
Listing Tasks#
We can request a listing of all our recently initiated tasks:
df_api.taskList()
(task {
   id: "task/412686509"
   type: TT_DATA_GET
   status: TS_SUCCEEDED
   client: "u/jca318"
   step: 2
   steps: 3
   msg: "Finished"
   ct: 1667098585
   ut: 1667098590
   source: "d/412681057"
   dest: "f134f91a-572a-11ed-ba55-d5fb255a47cc/C/Users/jca92/Documents/codes/Fall_2022_MEM_T680Data_Analysis_and_Machine_Learning/jupyterbook/Topic_7/DataFed/datapath"
 }
 task {
   id: "task/412686392"
   type: TT_DATA_PUT
   status: TS_SUCCEEDED
   client: "u/jca318"
   step: 3
   steps: 4
   msg: "Finished"
   ct: 1667098577
   ut: 1667098582
   source: "f134f91a-572a-11ed-ba55-d5fb255a47cc/C/Users/jca92/Documents/codes/Fall_2022_MEM_T680Data_Analysis_and_Machine_Learning/jupyterbook/Topic_7/DataFed/datapath/raw_data.txt"
   dest: "d/412681057"
 }
 task {
   id: "task/412685350"
   type: TT_DATA_PUT
   status: TS_SUCCEEDED
   client: "u/jca318"
   step: 3
   steps: 4
   msg: "Finished"
   ct: 1667098510
   ut: 1667098525
   source: "f134f91a-572a-11ed-ba55-d5fb255a47cc/C/Users/jca92/Documents/codes/Fall_2022_MEM_T680Data_Analysis_and_Machine_Learning/jupyterbook/Topic_7/DataFed/datapath/raw_data.txt"
   dest: "d/412685344"
 }
 task {
   id: "task/412685327"
   type: TT_DATA_PUT
   status: TS_SUCCEEDED
   client: "u/jca318"
   step: 3
   steps: 4
   msg: "Finished"
   ct: 1667098510
   ut: 1667098525
   source: "f134f91a-572a-11ed-ba55-d5fb255a47cc/C/Users/jca92/Documents/codes/Fall_2022_MEM_T680Data_Analysis_and_Machine_Learning/jupyterbook/Topic_7/DataFed/datapath/raw_data.txt"
   dest: "d/412685321"
 }
 task {
   id: "task/412685304"
   type: TT_DATA_PUT
   status: TS_SUCCEEDED
   client: "u/jca318"
   step: 3
   steps: 4
   msg: "Finished"
   ct: 1667098510
   ut: 1667098524
   source: "f134f91a-572a-11ed-ba55-d5fb255a47cc/C/Users/jca92/Documents/codes/Fall_2022_MEM_T680Data_Analysis_and_Machine_Learning/jupyterbook/Topic_7/DataFed/datapath/raw_data.txt"
   dest: "d/412685298"
 }
 task {
   id: "task/412685208"
   type: TT_DATA_PUT
   status: TS_SUCCEEDED
   client: "u/jca318"
   step: 3
   steps: 4
   msg: "Finished"
   ct: 1667098509
   ut: 1667098520
   source: "f134f91a-572a-11ed-ba55-d5fb255a47cc/C/Users/jca92/Documents/codes/Fall_2022_MEM_T680Data_Analysis_and_Machine_Learning/jupyterbook/Topic_7/DataFed/datapath/raw_data.txt"
   dest: "d/412685202"
 }
 task {
   id: "task/412685281"
   type: TT_DATA_PUT
   status: TS_SUCCEEDED
   client: "u/jca318"
   step: 3
   steps: 4
   msg: "Finished"
   ct: 1667098510
   ut: 1667098520
   source: "f134f91a-572a-11ed-ba55-d5fb255a47cc/C/Users/jca92/Documents/codes/Fall_2022_MEM_T680Data_Analysis_and_Machine_Learning/jupyterbook/Topic_7/DataFed/datapath/raw_data.txt"
   dest: "d/412685275"
 }
 task {
   id: "task/412685258"
   type: TT_DATA_PUT
   status: TS_SUCCEEDED
   client: "u/jca318"
   step: 3
   steps: 4
   msg: "Finished"
   ct: 1667098510
   ut: 1667098519
   source: "f134f91a-572a-11ed-ba55-d5fb255a47cc/C/Users/jca92/Documents/codes/Fall_2022_MEM_T680Data_Analysis_and_Machine_Learning/jupyterbook/Topic_7/DataFed/datapath/raw_data.txt"
   dest: "d/412685252"
 }
 task {
   id: "task/412685235"
   type: TT_DATA_PUT
   status: TS_SUCCEEDED
   client: "u/jca318"
   step: 3
   steps: 4
   msg: "Finished"
   ct: 1667098509
   ut: 1667098519
   source: "f134f91a-572a-11ed-ba55-d5fb255a47cc/C/Users/jca92/Documents/codes/Fall_2022_MEM_T680Data_Analysis_and_Machine_Learning/jupyterbook/Topic_7/DataFed/datapath/raw_data.txt"
   dest: "d/412685229"
 }
 task {
   id: "task/412685181"
   type: TT_DATA_PUT
   status: TS_SUCCEEDED
   client: "u/jca318"
   step: 3
   steps: 4
   msg: "Finished"
   ct: 1667098509
   ut: 1667098514
   source: "f134f91a-572a-11ed-ba55-d5fb255a47cc/C/Users/jca92/Documents/codes/Fall_2022_MEM_T680Data_Analysis_and_Machine_Learning/jupyterbook/Topic_7/DataFed/datapath/raw_data.txt"
   dest: "d/412685175"
 }
 task {
   id: "task/412685127"
   type: TT_DATA_PUT
   status: TS_SUCCEEDED
   client: "u/jca318"
   step: 3
   steps: 4
   msg: "Finished"
   ct: 1667098508
   ut: 1667098514
   source: "f134f91a-572a-11ed-ba55-d5fb255a47cc/C/Users/jca92/Documents/codes/Fall_2022_MEM_T680Data_Analysis_and_Machine_Learning/jupyterbook/Topic_7/DataFed/datapath/raw_data.txt"
   dest: "d/412685121"
 }
 task {
   id: "task/412685154"
   type: TT_DATA_PUT
   status: TS_SUCCEEDED
   client: "u/jca318"
   step: 3
   steps: 4
   msg: "Finished"
   ct: 1667098509
   ut: 1667098514
   source: "f134f91a-572a-11ed-ba55-d5fb255a47cc/C/Users/jca92/Documents/codes/Fall_2022_MEM_T680Data_Analysis_and_Machine_Learning/jupyterbook/Topic_7/DataFed/datapath/raw_data.txt"
   dest: "d/412685148"
 }
 task {
   id: "task/412684960"
   type: TT_DATA_PUT
   status: TS_SUCCEEDED
   client: "u/jca318"
   step: 3
   steps: 4
   msg: "Finished"
   ct: 1667098502
   ut: 1667098507
   source: "f134f91a-572a-11ed-ba55-d5fb255a47cc/C/Users/jca92/Documents/codes/Fall_2022_MEM_T680Data_Analysis_and_Machine_Learning/jupyterbook/Topic_7/DataFed/datapath/408461737.txt"
   dest: "d/412684954"
 }
 task {
   id: "task/412684882"
   type: TT_DATA_PUT
   status: TS_SUCCEEDED
   client: "u/jca318"
   step: 3
   steps: 4
   msg: "Finished"
   ct: 1667098497
   ut: 1667098502
   source: "f134f91a-572a-11ed-ba55-d5fb255a47cc/C/Users/jca92/Documents/codes/Fall_2022_MEM_T680Data_Analysis_and_Machine_Learning/jupyterbook/Topic_7/DataFed/datapath/408461737.txt"
   dest: "d/412684876"
 }
 task {
   id: "task/412684798"
   type: TT_DATA_PUT
   status: TS_SUCCEEDED
   client: "u/jca318"
   step: 3
   steps: 4
   msg: "Finished"
   ct: 1667098492
   ut: 1667098497
   source: "f134f91a-572a-11ed-ba55-d5fb255a47cc/C/Users/jca92/Documents/codes/Fall_2022_MEM_T680Data_Analysis_and_Machine_Learning/jupyterbook/Topic_7/DataFed/datapath/408461737.txt"
   dest: "d/412684792"
 }
 task {
   id: "task/412684738"
   type: TT_DATA_PUT
   status: TS_SUCCEEDED
   client: "u/jca318"
   step: 3
   steps: 4
   msg: "Finished"
   ct: 1667098486
   ut: 1667098492
   source: "f134f91a-572a-11ed-ba55-d5fb255a47cc/C/Users/jca92/Documents/codes/Fall_2022_MEM_T680Data_Analysis_and_Machine_Learning/jupyterbook/Topic_7/DataFed/datapath/408461737.txt"
   dest: "d/412684732"
 }
 task {
   id: "task/412684639"
   type: TT_DATA_GET
   status: TS_SUCCEEDED
   client: "u/jca318"
   step: 2
   steps: 3
   msg: "Finished"
   ct: 1667098473
   ut: 1667098478
   source: "d/412681057"
   dest: "f134f91a-572a-11ed-ba55-d5fb255a47cc/C/Users/jca92/Documents/codes/Fall_2022_MEM_T680Data_Analysis_and_Machine_Learning/jupyterbook/Topic_7/DataFed/datapath"
 }
 task {
   id: "task/412684536"
   type: TT_DATA_PUT
   status: TS_SUCCEEDED
   client: "u/jca318"
   step: 3
   steps: 4
   msg: "Finished"
   ct: 1667098465
   ut: 1667098470
   source: "f134f91a-572a-11ed-ba55-d5fb255a47cc/C/Users/jca92/Documents/codes/Fall_2022_MEM_T680Data_Analysis_and_Machine_Learning/jupyterbook/Topic_7/DataFed/datapath/raw_data.txt"
   dest: "d/412681057"
 }
 task {
   id: "task/412683328"
   type: TT_DATA_PUT
   status: TS_FAILED
   client: "u/jca318"
   step: 1
   steps: 4
   msg: "globus connect offline"
   ct: 1667098268
   ut: 1667098283
   source: "f134f91a-572a-11ed-ba55-d5fb255a47cc/C/Users/jca92/Documents/codes/Fall_2022_MEM_T680Data_Analysis_and_Machine_Learning/jupyterbook/Topic_7/DataFed/datapath/raw_data.txt"
   dest: "d/412683322"
 }
 task {
   id: "task/412683305"
   type: TT_DATA_PUT
   status: TS_FAILED
   client: "u/jca318"
   step: 1
   steps: 4
   msg: "globus connect offline"
   ct: 1667098268
   ut: 1667098283
   source: "f134f91a-572a-11ed-ba55-d5fb255a47cc/C/Users/jca92/Documents/codes/Fall_2022_MEM_T680Data_Analysis_and_Machine_Learning/jupyterbook/Topic_7/DataFed/datapath/raw_data.txt"
   dest: "d/412683299"
 },
 'TaskDataReply')
The output of this listing would be very helpful for the exercise below
Example scenario - Simulations #
Let’s say that we want to run a series of simulations where one or more parameters are varied and each simulation is run with a unique set of parameters. Let’s also assume that our eventual goal is to build a surrogate model for the computationally expensive simulation using machine learning. So, we want to capture the metadata and data associated with the series of simulations to train the machine learning model later on.
We have set up skeleton functions and code snippets to help you mimic the data management for such a simulation. We would like you to take what you have learnt so far and fill in the blanks
Fake simulation#
Here, we have simulated a computationally “expensive” simulation that simply sleeps for a few seconds.
import time


def expensive_simulation():
    time.sleep(5)
    # Yes, this simulation is deterministic and always results in the same result:
    path_to_results = datapath + "/408461737.txt"
    # The simulation uses the same combination of parameters
    metadata = {"a": 1, "b": 2, "c": 3.14}
    return path_to_results, metadata
Exercise #
Define a function that:
1. creates a new Data Record with the provided metadata (as a dictionary) and other details,
2. extracts the record id,
3. puts the raw data into the record,
4. extracts
5. Returns the task ID.
Feel free to print any messages that may help you track things.
Note
Pay attention to the wait keyword argument when putting the raw data into record
# Your Code Goes Here
def capture_data(
    simulation_index,  # integer - counter to signify the Nth simulation in the series
    metadata,  # dictionary - combination of parameters used for this simulation
    raw_data_path,  # string - Path to the raw data file that needs to be put into the receord
    parent_collection=parent_collection,  # string - Collection to create this Data Record into
):

    # 1. Create a new Data Record with the metadata and use the simulation index to provide a unique title
    rec_resp = df_api.dataCreate(
        "Simulation_" + str(simulation_index),
        metadata=json.dumps(metadata),
        parent_id=parent_collection,
    )

    # 2. Extract the record ID from the response
    this_rec_id = rec_resp[0].data[0].id

    # 3. Put the raw data into this record:
    put_resp = df_api.dataPut(this_rec_id, raw_data_path, wait=False)

    # 4. Extract the ID for the data transfer task
    task_id = put_resp[0].task.id

    # 5. Return the task ID
    return task_id
Exercise #
Try out this function to make sure it works. See what it does on the DataFed web portal.
path_to_results, metadata = expensive_simulation()

task_id = capture_data(14, metadata, path_to_results)
task_id
'task/412686610'
We might want a simple function to monitor the status of all the data upload tasks. Define a function that accepts a list of task IDs and returns their status after looking them up on DataFed
def check_xfer_status(task_ids):

    # put singular task ID into a list
    if isinstance(task_ids, str):
        task_ids = [task_ids]

    # Create a list to hold the statuses of each of the tasks
    statuses = list()

    # Iterate over each of the task IDs
    for this_task_id in task_ids:

        # For each task ID, get detailed information about it
        task_resp = df_api.taskView(this_task_id)

        # Extract the task status from the detailed information
        this_status = task_resp[0].task[0].status

        # Append this status to the list of statuses
        statuses.append(this_status)

    # Return the list of statuses
    return statuses
Exercise #
Try out your function using the IDs of the recent dataPut() and dataGet() functions.
check_xfer_status(task_id)
[2]
Run the series of simulations:#
Use the three functions defined above to mimic the process of exploring a parameter space using simulations, where for each iteration, we:
Run a simulation
Capture the data + metadata into DataFed
Monitor the data upload tasks.
xfer_tasks = list()
for ind in range(3):
    print("Starting simulation #{}".format(ind))
    # Run the simulation.
    path_to_results, metadata = expensive_simulation()
    # Capture the data and metadata into DataFed
    task_id = capture_data(ind, metadata, path_to_results)
    # Append the task ID for this data upload into xfer_tasks
    xfer_tasks.append(task_id)
    # Print out the status of the data transfers
    print("Transfer status: {}".format(check_xfer_status(xfer_tasks)))
    print("")

print("Simulations complete! Waiting for uploads to complete\n")

while True:
    time.sleep(5)
    statuses = check_xfer_status(xfer_tasks)
    print("Transfer status: {}".format(statuses))
    if all([this == 3 for this in statuses]):
        break

print("\nFinished uploading all data!")
Starting simulation #0
Transfer status: [2]

Starting simulation #1
Transfer status: [2, 2]

Starting simulation #2
Transfer status: [3, 2, 2]

Simulations complete! Waiting for uploads to complete
Transfer status: [3, 3, 3]

Finished uploading all data!
Note
It is recommended to perform data orchestration (especially large data movement - upload / download) operations outside the scope of heavy / parallel computation operations in order to avoid wasting precious wall time on compute clusters
Collections and Queries in DataFed#
In this notebook, we will be going over creating Collections, viewing contained items, organizing Collections, downloading Collections, and searching for data
Import necessary libraries
import os
import json
from datafed.CommandLib import API
Instantiate the DataFed API and set context to the Training project
df_api = API()
df_api.setContext("p/trn001")
Exercise #
Reset this variable to your username or Globus ID so that you work within your own collection by default
# Your Code Goes Here
parent_collection = "jca318" # Name of this user
Example use case:#
Let us assume that we are working on a machine learning problem aimed at putting together training data for a machine learning model. For illustration purposes, we will assume that we aim to train a classifier for classifying animals
Create Collection#
First, let us create a collection to hold all our data.
We will be using the collectionCreate() function:
coll_resp = df_api.collectionCreate(
    "Image classification training data", parent_id=parent_collection
)
print(coll_resp)
(coll {
  id: "c/412686982"
  title: "Image classification training data"
  owner: "p/trn001"
  creator: "u/jca318"
  ct: 1667098620
  ut: 1667098620
  parent_id: "c/50107115"
}
, 'CollDataReply')
In this case we got back a CollDataReply object. This is somewhat similar to what you get from dataCreate() we just saw.
Now, let’s Extract the id of this newly created collection:
train_coll_id = coll_resp[0].coll[0].id
print(train_coll_id)
c/412686982
Populate with training data#
Now that we have a place to put the training data, let us populate this collection with examples of animals
Define a function to generate (fake) training data:#
We need a function to:
Create a Data Record
Put data into this Data Record
For simplicity we will use some dummy data from a public Globus Endpoint This information has been filled in for you via the raw_data_path variable.
We have a skeleton function prepared for you along with comments to guide you
import random

def generate_animal_data(is_dog=True):
    this_animal = "cat"
    if is_dog:
        this_animal = "dog"
    # Ideally, we would have more sensible titles such as "Doberman", "Poodle", etc. instead of "Dog_234"
    # To mimic a real-life scenario, we append a number to the animal type to denote
    # the N-th example of a cat or dog. In this case, we use a random integer.
    title = this_animal + "_" + str(random.randint(1, 1000))
    # Create the record here:
    rec_resp = df_api.dataCreate(
        title, metadata=json.dumps({"animal": this_animal}), parent_id=train_coll_id
    )

    # Extract the ID of the Record:
    this_rec_id = rec_resp[0].data[0].id

    # path to the file containing the (dummy) raw data
    raw_data_path = datapath + "/raw_data.txt"

    # Put the raw data into the record you just created:
    put_resp = df_api.dataPut(this_rec_id, raw_data_path)

    # Only return the ID of the Data Record you created:
    return this_rec_id
Generate 5 examples of cats and dogs:#
cat_records = list()
dog_records = list()
for _ in range(5):
    dog_records.append(generate_animal_data(is_dog=True))
    time.sleep(0.1)
for _ in range(5):
    cat_records.append(generate_animal_data(is_dog=False))
    time.sleep(0.1)
print(cat_records)
['d/412687128', 'd/412687151', 'd/412687174', 'd/412687197', 'd/412687220']
print(dog_records)
['d/412686997', 'd/412687024', 'd/412687051', 'd/412687078', 'd/412687105']
Listing items in a Collection:#
Let us take a look at the training data we have assembled so far using the colectionItemsList() function:
coll_list_resp = df_api.collectionItemsList(train_coll_id, offset=5)
print(coll_list_resp)
(item {
  id: "d/412686997"
  title: "dog_164"
  owner: "p/trn001"
  creator: "u/jca318"
  size: 0.0
  notes: 0
}
item {
  id: "d/412687105"
  title: "dog_177"
  owner: "p/trn001"
  creator: "u/jca318"
  size: 0.0
  notes: 0
}
item {
  id: "d/412687024"
  title: "dog_473"
  owner: "p/trn001"
  creator: "u/jca318"
  size: 0.0
  notes: 0
}
item {
  id: "d/412687078"
  title: "dog_527"
  owner: "p/trn001"
  creator: "u/jca318"
  size: 0.0
  notes: 0
}
item {
  id: "d/412687051"
  title: "dog_531"
  owner: "p/trn001"
  creator: "u/jca318"
  size: 0.0
  notes: 0
}
offset: 5
count: 20
total: 10
, 'ListingReply')
Note
If we had several dozens, hundreds, or even thousands of items in a Collection, we would need to call collectionItemsList() multiple times by stepping up the offset keyword argument each time to get the next “page” of results.
Discussion
Let’s say that we are only interested in finding records that have cats in this (potentially) large collection of training data. How do we go about doing that?
Data Query / Search#
Use the DataFed web interface to:
Search for cats
Specifically in your collection
Save the query
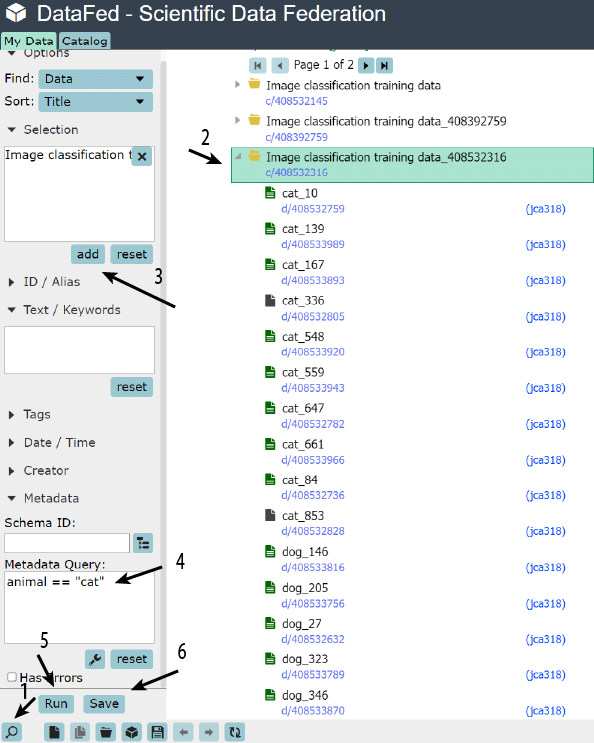
Note
Saved queries can be found in the bottom of the navigation (left) pane under Project Data and Saved Queries
Finding Saved Queries:#
We can list all saved queries via queryList():
ql_resp = df_api.queryList()
print(ql_resp)
(item {
  id: "q/408394603"
  title: "cat"
}
item {
  id: "q/412653216"
  title: "cat"
}
item {
  id: "q/412658711"
  title: "cat"
}
item {
  id: "q/408540273"
  title: "cat"
}
item {
  id: "q/412658874"
  title: "cat2"
}
item {
  id: "q/408540601"
  title: "catter"
}
item {
  id: "q/249837250"
  title: "L1_A1"
}
offset: 0
count: 20
total: 7
, 'ListingReply')
Exercise #
Get the id of the desired query out of the response:
# Your Code Goes Here
id_ = [i.title for i in ql_resp[0].item].index("cat2")
query_id = ql_resp[0].item[id_].id
print(query_id)
q/412658874
View the saved query#
Use the queryView() function:
df_api.queryView(query_id)
(id: "q/412658874"
 title: "cat2"
 owner: "u/jca318"
 ct: 1667072632
 ut: 1667072632
 query {
   mode: SM_DATA
   owner: "p/trn001"
   coll: "c/412657579"
   meta: "animal == \"cat\""
   sort: SORT_TITLE
   sort_rev: false
 },
 'QueryDataReply')
Run a saved query#
Use the queryExec() function:
query_resp = df_api.queryExec(query_id)
print(query_resp)
(item {
  id: "d/412657841"
  title: "cat_159"
  owner: "p/trn001"
  size: 17.0
  notes: 0
}
item {
  id: "d/412657739"
  title: "cat_18"
  owner: "p/trn001"
  size: 17.0
  notes: 0
}
item {
  id: "d/412657818"
  title: "cat_357"
  owner: "p/trn001"
  size: 17.0
  notes: 0
}
item {
  id: "d/412657795"
  title: "cat_693"
  owner: "p/trn001"
  size: 17.0
  notes: 0
}
item {
  id: "d/412657766"
  title: "cat_882"
  owner: "p/trn001"
  size: 17.0
  notes: 0
}
offset: 0
count: 5
total: 5
, 'ListingReply')
Yet again, we get back the ListingReply message.
Now let us extract just the ids from each of the items in the message:
cat_rec_ids = list()
for record in query_resp[0].item:
    cat_rec_ids.append(record.id)

# one could also use list comprehensions to get the answer in one line:
# cat_rec_ids = [record.id for record in query_resp[0].item]
print(cat_rec_ids)
['d/412657841', 'd/412657739', 'd/412657818', 'd/412657795', 'd/412657766']
We already have the ground truth in cat_records. Is this the same as what we got from the query?
# Note, you might get a false response if you have run this script more than once
print(set(cat_rec_ids) == set(cat_records))
False
Separating cats from dogs#
Our goal now is to gather all cat Data Records into a dedicated Collection
Exercise #
Create a new collection to hold the Cats record
# Your Code Goes Here
coll_resp = df_api.collectionCreate("Cats", parent_id=train_coll_id)
Exercise #
Extract the id for this Collection:
# Your Code Goes Here
cat_coll_id = coll_resp[0].coll[0].id
print(cat_coll_id)
c/412687393
Adding Items to Collection#
Now let us add only the cat Data Records into this new collection using the collectionItemsUpdate() function:
cup_resp = df_api.collectionItemsUpdate(cat_coll_id, add_ids=cat_rec_ids)
print(cup_resp)
(, 'ListingReply')
Unlike most DataFed functions, this function doesn’t really return much
Now, let us view the contents of the Cats Collection to make sure that all Cat Data Records are present in this Collection.
Just to keep the output clean and short, we will only extract the ID and title of the items
ls_resp = df_api.collectionItemsList(cat_coll_id)
# Iterating through the items in the Collection and only extracting a few items:
for obj in ls_resp[0].item:
    print(obj.id, obj.title)
d/412657841 cat_159
d/412657739 cat_18
d/412657818 cat_357
d/412657795 cat_693
d/412657766 cat_882
Exercise #
View the contents of the main training data Collection.
You may use the snippet above if you like and modify it accordingly
# Your Code Goes Here
ls_resp = df_api.collectionItemsList(train_coll_id)
# Iterating through the items in the Collection and only extracting a few items:
for obj in ls_resp[0].item:
    print(obj.id, obj.title)
c/412659270 Cats
d/412657841 cat_159
d/412657739 cat_18
d/412657818 cat_357
d/412657795 cat_693
d/412657766 cat_882
d/412657716 dog_224
d/412657635 dog_562
d/412657608 dog_576
d/412657689 dog_961
d/412657662 dog_982
Note
Data Records can exist in multiple Collections just like video or songs can exist on multiple playlists
Exercise #
Remove the cat Data Records from the training data collection. They already exist in the “Cats” Collection.
Hint: The function call is very similar to the function call for adding cats to the “Cats” collection
# Your Code Goes Here
cup_resp = df_api.collectionItemsUpdate(train_coll_id, rem_ids=cat_rec_ids)
print(cup_resp)
(, 'ListingReply')
Exercise #
View the contents of the training data Collection.
You may reuse a code snippet from an earlier cell.
Do you see the individual cat Data Records in this collection?
# Your Code Goes Here
ls_resp = df_api.collectionItemsList(train_coll_id)
# Iterating through the items in the Collection and only extracting a few items:
for obj in ls_resp[0].item:
    print(obj.id, obj.title)
c/412659270 Cats
d/412657716 dog_224
d/412657635 dog_562
d/412657608 dog_576
d/412657689 dog_961
d/412657662 dog_982
Search or Organize?#
If you could always search for your data, what is the benefit to organizing them into collections?
If you have a collection it is very easy to download the entire collection!
Download entire Collection#
Note
DataFed can download arbitrarily large number of Records regardless of the physical locations of the DataFed repositories containing the data.
Let us first make sure we don’t already have a directory with the desired name:
dest_dir = datapath + "/cat_data"

if os.path.exists(dest_dir):
    import shutil

    shutil.rmtree(dest_dir)
Exercise #
Download the entire Cat Collection with a single DataFed function call.
Hint: You may want to look at a
# Your Code Goes Here
df_api.dataGet(cat_coll_id, datapath + "/cat_data", wait=True)
(task {
   id: "task/412659666"
   type: TT_DATA_GET
   status: TS_SUCCEEDED
   client: "u/jca318"
   step: 2
   steps: 3
   msg: "Finished"
   ct: 1667073220
   ut: 1667073235
   source: "d/412657841, d/412657739, d/412657818, d/412657795, d/412657766, ..."
   dest: "f134f91a-572a-11ed-ba55-d5fb255a47cc/c/Users/jca92/Documents/codes/MEM_Data_Analysis_Dev/Fall_2022_MEM_T680/jupyterbook/week_6/DataFed/datapath/cat_data"
 },
 'TaskDataReply')
Let’s verify that we downloaded the data:
os.listdir(dest_dir)
['412657739.txt',
 '412657766.txt',
 '412657795.txt',
 '412657818.txt',
 '412657841.txt']